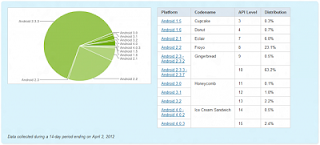
Dear friends As per the latest statistics released by Google Inc., it shows that still 23.1% of the Android devices are on the Froyo 2.2 firmware version and for all those devices who wishes to root. There is one of the famous tools for rooting called as Z4Root and in the due course of the article we will be checking out on what are the devices which support. Please note that since we understand that rooting the device will void the warranty, we will also guide you so that you can unroot the device.
Disclaimer: Neither we, nor developer should be held responsible for any damage happened to your device in the process of following the instructions mentioned in this article. It’s very unlikely that there will be any issues but just in case if at all there are any issues then we are committed to help you in solving the same.
Compatible with PERMANENT root option:
- Samsung Galaxy S (All variants)
- Backflip
- Sony X10
- Xperia Mini
- Droid 2
- Galaxy Tab
- Galaxy I5700
- Galaxy 3 I5800
- Droid X
- Samsung Acclaim
- Cricket Huawei Ascend
- Motorola Cliq
- Huawei 8120
- Hero
- G1
- Optimus T
- Droid 1
- Garmin Asus A50
- Motorola Defy
- LG Ally
- Motorola Flipside
- Motorola Milestone 2
- Dell streak
- X10 Mini Pro
- Smartq v7 android 2.1
Incompatible with PERMANENT root option:
- Desire (requires nand unlock)
- Desire HD (requires nand unlock)
- Magic (unknown)
- Evo (requires nand unlock)
- G2 (requires nand unlock)
- Archos 70 (unknown)
- myTouch 3G (unknown)
- Wildfire
- Droid Incredible
So let’s check out on how you can root your devices which are mentioned above. Before proceeding, you need to ensure that you follow a quick list of pre requisites which you need to follow.
Express Pre Requisites:
Backup the data present in your phone, as there is a possibility that the data in the phone may get lost. So with the help of
below mentioned steps, you can easily backup the data. Don’t use the PC Suite to back up the data as it may or may not support the rooted device.
SMS ,Contacts,Call Log ,Images, Songs, Videos, Files – Copy to internal / External SD Card,
APN and MMS Settings – Note down from the path “Applications > Settings > Wireless and Network > Mobile Networks > Access Point Names”
Minimum charge left in the device should be at least 60% so as to ensure that device doesn’t get turned Off in the middle of firmware update.
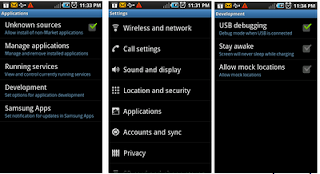
Enable the USB Debugging in your HTC Desire from the path “Settings > Applications > Development > USB debugging”. The USB Debugging option should be ticked as shown in the below screen capture.
Ensure that you have disabled all the antivirus suites in your computer as these tools generally interrupt the process of firmware update.
So assuming that you have followed all the instructions, you can now proceed to the next page where we have summed up a detailed article on how to update with the same.
Procedure to Root Android Phone with Z4 Rooting App:
Download the Z4 Root APK File from here to your computer and after that connect your phone to the computer with the help of original USB cable.
Now, connect your phone with the computer using the USB cable and place the downloaded Z4Root apk file in your device’s SD Card.
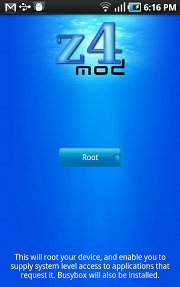
Disconnect the phone from computer and open the Z4 Rooting application in your phone from the file explorer to install the same. Once the Z4Root app is installed in your phone, open the same after which you will get to see the screen as mentioned below.
To permanent root, all you need to select is the option of “Permanent Root” and for “Temporary Root”, you need to select the corresponding option. Please note that temporary root will only keep the device rooted till the device is rebooted.
After this, similarly you can also Unroot the device with this application by following the simple on screen instructions.
Note: At any point of time just in case if the process of firmware update gets stopped due to any reason, all you need to do is restart the process from the start by re inserting the battery.
Just in case if you face any issues do let us know in the comments section below as we will try to address the same at the earliest. Congratulations, you have now successfully rooted the device. 




.jpg)
