
Disclaimer: Neither we, nor developer should be held responsible for any damage happened to your device in the process of following the instructions mentioned in this article. It’s very unlikely that there will be any issues but just in case if at all there are any issues then we are committed to help you in solving the same.
Before proceeding, you need to check whether your phone is on DDKP3 2.3.6 Firmware or not from the path Settings > About Phone > Firmware Version” where it should show the current firmware is DDKP3 Gingerbread 2.3.6 firmware. If there is any other version being shown then you need to update with the DDKP3 2.3.6 Firmware. This procedure to root should only be applied to the devices which have the model number as GT I9003.
Pre Requisites:
In the process of rooting your device, there is a possibility that the data may get lost or corrupted. So, it’s better to back up all the data so that just in case if any data is lost or corrupted, the same can be restored with the help of below mentioned steps.
SMS,Contacts,Call Log,Images, Songs, Videos, Files – Copy to internal / External SD Card,
APN and MMS Settings – Note down from the path “Applications > Settings > Wireless and Network > Mobile Networks > Access Point Names”
Minimum charge left in the device should be at least 60% so as to ensure that device doesn’t get turned Off in the middle of firmware update.
Disable all the security suites installed in your computer and uninstall all antivirus tools in your computer so as to ensure that the firmware update is not interrupted in the middle of the process.
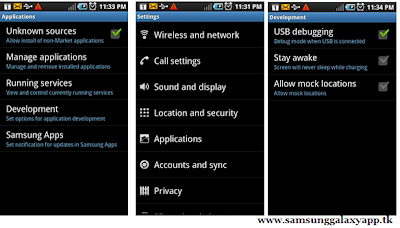
Enable the USB Debugging in your Galaxy SL I9003 from the path “Settings > Applications > Development > USB debugging”. The USB Debugging option should be ticked.
So assuming that you have followed all the instructions carefully, you can now proceed to the next page where we have summed up a detailed tutorial on how to apply this update in your phone.
First up you need to download the Rooting Package from here to your computer and once its done, you need to extract the same to get the Odin and rooting tar file as shown below. Even if single file is missing, download the file again.

Now after extracting, open the Odin in your computer and turn Off your Galaxy SL I9003 and open the Odin in your computer.

Download mode can be entered by pressing Volume down Key, Center button, and holding both simultaneously press the Power Button after which a green robot will be shown indicating the Download Mode has been entered. If the device boots in the normal mode then you will have to try again entering into the download mode.
Note: if the ID : COM section doesn’t turn Yellow, you need to check with two things which are mentioned below,
Install the USB Drivers in your computer & Go to the Path “Settings > Wireless & Network > USB Settings” and
Ensure that “Samsung KIES” option is ticked before connecting the phone to the computer
In Odin, you need to click on “PDA” and select “DDKP3-CFROOT-12-02-2012” and click on “Start” to start the rooting process.
As soon as the phone gets rooted successfully, Galaxy SL I9003 will be rebooted and once you see the home screen, turn off the phone and remove the connected usb cable. Now, turn ON the phone in the recovery mode.
Recovery mode can be entered by pressing Volume Up Key, Center button, and holding both simultaneously press the Power Button after which a recovery mode list will be shown indicating the recovery Mode has been entered.
In recovery mode, select Wipe data/factory reset and also you need to select Wipe Cache partition and then reboot your device by selecting reboot system now with the help of Volume rocker keys. Once it’s done, you then will have to select the option of “reboot system now” for restarting the device.
Note: At any point of time just in case if the process of firmware update gets stopped due to any reason, all you need to do is restart the process from the start by re inserting the battery.


.jpg)
1 comments
Wifi not works!
Post a Comment